One of the things that has been really lacking in WordPress is the ability to easily administer your theme menu(s). Sure, there are quite a few plugins available that made it significantly easier, but there was never any “built in” methods. This has now changed with the release of WordPress 3.0 and in my opinion, it’s one its best new features.
The only catch of course, is that your theme needs to support this new feature. Fear not though, as you’ll see here, it’s extremely easy to implement into your existing theme.
Step 1: Register your menu
The first thing you need to do is to register your menu so that you can use it within your theme. There are two functions you can use, depending whether you’d like to register just one menu or multiple menus.
To register a single navigation menu, use:
register_nav_menu( $location, $description );
$location is the slug name
$description is the label used within the Dashboard
To register a multiple navigation menus, use:
register_nav_menus( $locations = array() );
$location is an array of menu slug names & labels
Within your functions.php file, add the following code to register your menu. To ensure backwards compatibility for earlier versions of WordPress, verify the function exists prior to usage by calling function_exists().
if ( function_exists( 'register_nav_menu' ) ) {
	register_nav_menu( 'main-menu', 'Main Menu' );
}
Step 2: Displaying your new menu
There are two ways that you can display your navigation menu within your theme. You can either add the menu directly into your theme code using the wp_nav_menu() function, or you can add the menu by using the new Custom Menu widget.
Using the Custom Menu widget
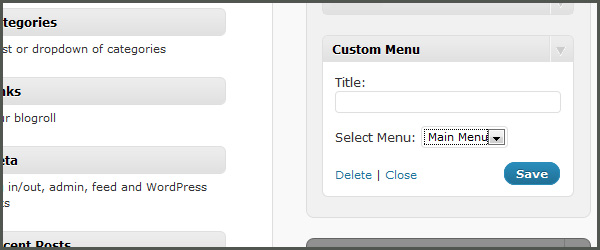
Provided your theme allows for widgets, simply drag the Custom Menu Widget across to one of your sidebars. You can then give it an (optional) Title as well as selecting your menu from the drop-down list. The name that appears in the list will be the label that you used in the call to register_nav_menu().

Using the wp_nav_menu function
If you’d like more control over your menu, you can use the wp_nav_menu() function. The simplest form is to simply call it without any arguments, by adding the following code to your theme wherever you’d like your menu to appear.
<?php wp_nav_menu(); ?>
For even more customisation, the following arguments are available to use:
- $menu: (string) The menu that is desired; accepts (matching in order) id, slug, name
- $container: (string) Whether to wrap the ul, and what to wrap it with
- $container_class: (string) The class that is applied to the container
- $container_id: (string) The ID that is applied to the container
- $menu_class: (string) CSS class to use for the ul element which forms the menu
- $menu_id: (string) The ID that is applied to the ul element which forms the menu
- $echo: (boolean) Whether to echo the menu or return it
- $fallback_cb: (string) If the menu doesn’t exists, the callback function to use
- $before: (string) Output text before the link text
- $after: (string) Output text after the link text
- $link_before: (string) Output text before the link
- $link_after: (string) Output text after the link
- $depth: (integer) How many levels of the hierarchy are to be included where 0 means all
- $walker: (object) Custom walker object to use
- $theme_location: (string) The location in the theme to be used – must be registered with register_nav_menu() in order to be selectable by the user
For our particular menu we want to specify the menu that we registered earlier (main-menu). We also want to specify the containing class for the menu. Within your theme files, wherever you’d like your menu displayed, add the following code.
<?php wp_nav_menu( array( 'menu' => 'main-menu', 'container_class' => 'nav' ) ); ?>
Step 3: Setting up your menu within the Dashboard
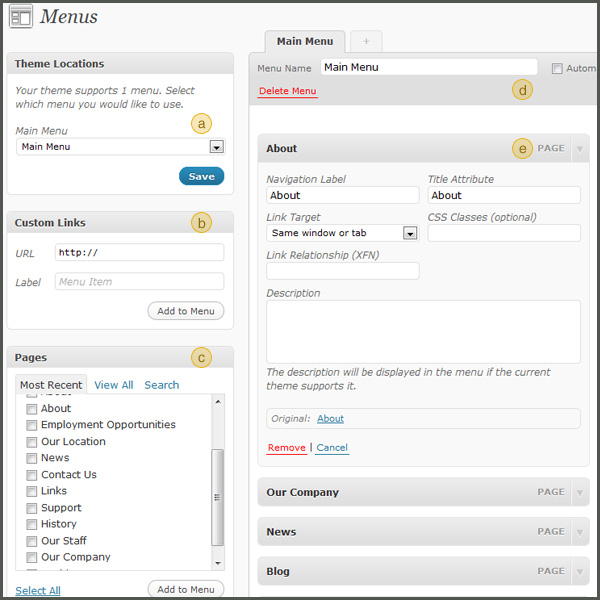
After you’ve updated your theme files, the next task is to actually set up your menu within the WordPress Dashboard. The Menus option can be found within the Appearance section of the left hand navigation. Once you click this, you should be presented with something similar to the image below…

3.1 Select your menu
Section (a) is where you select your menu that you’d like to use. The only menus displayed are the ones that you’ve registered within your functions.php file.
3.2 Specifying custom links
If you’d like to specify a custom link, as opposed one of your existing Pages, simply enter the URL and a menu label into Section (b). Once you click the Add to Menu button, your new menu item will appear in Section (e).
3.3 Specifying a page link
Most times you’ll simply want your menu items to link to Pages that you’ve created. Section (c) allows you to select which pages you’d like to link. Simply tick the appropriate checkboxes and then click the Add to Menu button.
3.4 Naming your menu
Enter in an appropriate name for your menu in the Menu Name text field in Section (d). This name should match the name that you’ve used when registering your menu in the functions.php file which in turn matches the name used in the wp_nav_menu function, without the hyphens. In our case the menu name would simply be Main Menu.
3.5 Fine-tuning your menu options
Section (e) is where all your menu items will be listed. Clicking the small down arrow next to each menu item will display the individual menu options shown above. Each of the menu items can be easily dragged into a more appropriate order if so required. Also, if your menu is going to be a dropdown menu, then you can also drag the items onto each other so as to form a hierarchy.
If you find that not all the above menu options are displaying such as CSS Classes or if the Custom Links section is not displayed, for example, then click on the Screen Options link at the top-right of the Dashboard. You will be presented with a configuration panel where you can specify what options are displayed.

Simply tick the options that you’d like to appear. For example, ticking the Posts checkbox will allow you to add your Posts to your menu in the same way that you add your Pages. If you’d like to be able to specify a particular class for an individual menu item, tick the CSS Classes checkbox. This is handy if your dropdown menu requires you to add specific classes to the first & last dropdown menu items, for styling purposes.
3.6 Saving your menu
Last but not least, don’t forget to save your menu by clicking the Save Menu button on the far right of the screen (not displayed).
Step 4: Styling your menu
Although I’m not going to go into how you style your menu using css, I would like to point out one handy feature of this new menu system. You can use the current-menu-item class to style the menu option of the currently selected page. This allows you to highlight or identify the individual menu item associated with the page that is currently being viewed. As an example, the following CSS could be used to style our current menu item. Since I specified the container_class as nav when I originally set up the menu, I need to include this class as part of the css.
.nav li.current-menu-item a {
        font-weight:bold;
	color:#0082c8;
}
This should give you enough information to add a WP3.0 custom menu to any of your themes. It’s a great feature for this new version of WordPress and one which I’ll be using quite frequently from now on.
Have you implemented this new menu feature in your theme? Are you planing on using the new menus feature? Leave a comment and let me know. I’d love to hear. 🙂
This was very helpful in understanding how the new WordPress navigation works. I like how everything is simple and straightforward. Thanks for the useful post. 🙂
Thanks for the comment Elena. Glad you found it useful 🙂
You Sir are a hero.
I’ve been pouring over articles all morning (while pulling out my hair) on how to update my theme to use the new menu system. Your clear directions sank in on the first read.
Thank you 🙂
Awww Thanks Lee. Glad you were able to follow them easy enough. That’s fantastic and very good to hear. Thanks for the comment 🙂
Cool, good post.
Thanks!
Ótimo post.
Obrigado!
Thanks Alan 🙂
Thanks mate, just what I was looking for. Keep it up.
Thanks Andrew. Glad it helped 🙂
Thanks, that helped me a lot
i just had to add to css !important to color, so “anchor” tag can have different color:)
Glad it helped you out Piotr. Thanks for leaving a comment 🙂
It’s awesome tut.Thanks you so much
Thanks Huang. Glad you enjoyed it 🙂
Thanks for this excellent writeup Anthony, for once some of the advanced selectors made sense to me.
Cheers
You’re very welcome JT. Glad you found it useful 🙂